Showing posts with label Google. Show all posts

Monday, July 16, 2012

Mini How-to : Google Drive under Linux: Synchronize your Google Drive under Linux with grive ! (waiting for the official Google client ^^)


Edit 10/18/2012:
Take a look at new project https://www.insynchq.com/, it's very easy to install and use, offers much more integration in Linux desktop than grive.

Very great !!!


Official Linux Google drive version is still lacking... if you are as i am addicted to various Google Services this lack is very frustrating ! (what does Google waits for ???)

Fortunately, you can now, thanks to "grive" and its author, synchronize your local documents to your Google Drive in command line :-)

Here's how in a few command lines:

Install grive:

Install grive (under Ubuntu and derived distributions)

sudo add-apt-repository ppa:nilarimogard/webupd8

sudo apt-get update

sudo apt-get install grive

Configure first launch to authorize grive to access to your Google Drive:

Go to the directory you to be synchronize with Google Drive and configure grive

$ cd <My Local Directory to synchronize>
$ grive
-----------------------                                                                                                                     
Please go to this URL and get an authentication code:                                                                                       
                                                                                                                                            
https://accounts.google.com/o/oauth2/auth?scope=https%3A%2F%2Fwww.googleapis.com%2Fauth%2Fuserinfo.email+https%3A%2F%2Fwww.googleapis.com%2F
auth%2Fuserinfo.profile+https%3A%2F%2Fdocs.google.com%2Ffeeds%2F+https%3A%2F%2Fdocs.googleusercontent.com%2F+https%3A%2F%2Fspreadsheets.goog
le.com%2Ffeeds%2F&redirect_uri=urn:ietf:wg:oauth:2.0:oob&response_type=code&client_id=22314510474.apps.googleusercontent.com                
                                                                                                                                            
-----------------------                                                                                                                     
Please input the authentication code here:   


Open your Web browser, paste this URL and login with your Google account when asked and finally copy the code that Google will provide to paste into the terminal

grive will execute the first synchronization:

Reading local directories
Synchronizing folders
Reading remote server file list
Detecting changes from last sync
Synchronizing files
Finished!  


You're done, now every time you want to synchronize your local data with your Google Drive, just enter a terminal, "cd" to your directory and enter "grive" command line.

It is not necessary anymore to run it with "-a" option as its purpose was to configure and associate your computer with your Google drive account, just run grive with no option to initiate synchronization.

You may also want to see others options such as "-v" to enable more verbose mode or "--dry-run" to simulate execution, just see help:

grive --help                                                                                                         
Grive options:                                                                                                                              
  -h [ --help ]         Produce help message                                                                                                
  -v [ --version ]      Display Grive version                                                                                               
  -a [ --auth ]         Request authorization token                                                                                         
  -V [ --verbose ]      Verbose mode. Enable more messages than normal.                                                                     
  -d [ --debug ]        Enable debug level messages. Implies -v.                                                                            
  -l [ --log ] arg      Set log output filename.                                                                                            
  -f [ --force ]        Force grive to always download a file from Google Drive                                                             
                        instead of uploading it.                                                                                            
  --dry-run             Only detect which files need to be uploaded/downloaded,                                                             
                        without actually performing them.  


Really great work from the author (see man):

AUTHOR                                                                                                                                      
       The software was developed by Nestal Wan.                                                                                            
                                                                                                                                            
       This manpage was written by Jose Luis Segura Lucas (josel.segura@gmx.es)   


Now we (all Linux Google services users) are still waiting from Google to finally provide us their official client... Google listen to us, it would be nice not to forgive Linux users :-)


Sunday, July 15, 2012

SSH / Google 2-Step Authentication How-To : Enhance your SSH security with Google Two factor Authentication Service


*** Updated March 9, 2013  ***

Major changes:
03/09/2013 - Added missing pam settings upon user comment

The Goal:


Google provides for free a great service to enhance your Google account security called "Google 2-Step Authentication"  (also called two factor authentication) and offers a real strong authentication mechanism.

This service can also easily be used to enhance your SSH access security.
In a few words, you will be able to protect your SSH access with strong authentication using your smartphone as a software token.

Do not hesitate to read official Google page if you need more information:

You may also read my article about configuring it to protect your Google account access:

Other useful sources (thanks to various authors):

What you need:

  • A running Linux Box with SSH installed and accessible
  • A smartphone : Iphone, Android or RIM

Step 1: Install Google Authenticator


Tested under Ubuntu 12.04 TLS:
sudo apt-get install libpam-google-authenticator

Step 2: Configure SSH to use Google Authenticator


Edit "/etc/pam.d/sshd" with your favorite text editor and add:
auth required pam_google_authenticator.so

Edit "/etc/ssh/sshd_config" and set:
ChallengeResponseAuthentication yes

Edit "/etc/pam.d/common-auth" and set:


auth required pam_google_authenticator.so
auth [success=1 default=ignore] pam_unix.so nullok_secure


As the user you want to connect with, configure your Google two factors authentication:

$ google-authenticator
https://www.google.com/chart?chs=200x200&chld=M|0&cht=qr&chl=otpauth://totp/user@host%3Fsecret%3DZDTR6VU5FR5OIZ3G

<BAR CODE>
       
Your new secret key is: ZDTR6VU5FR5OIZ3G
Your verification code is 843231
Your emergency scratch codes are:
  31043901
  75807840
  98606066
  42902460
  31208347

Do you want me to update your "~/.google_authenticator" file (y/n)

Do you want to disallow multiple uses of the same authentication
token? This restricts you to one login about every 30s, but it increases
your chances to notice or even prevent man-in-the-middle attacks (y/n) y

By default, tokens are good for 30 seconds and in order to compensate for
possible time-skew between the client and the server, we allow an extra
token before and after the current time. If you experience problems with poor
time synchronization, you can increase the window from its default
size of 1:30min to about 4min. Do you want to do so (y/n) y

If the computer that you are logging into isn't hardened against brute-force
login attempts, you can enable rate-limiting for the authentication module.
By default, this limits attackers to no more than 3 login attempts every 30s.
Do you want to enable rate-limiting (y/n) y


Note: 
Emergency codes are provided in case of your phone would be unavailable, you should keep it somewhere 

Open your Google Authenticator application on your phone, click on "+" and "read bar code", get the bar code provided by the terminal, it will be added automatically in the application.


Restart ssh:
sudo service ssh restart


Note:
I recommend you to keep your opened terminal up in case you would be unable to connect 


Step 3: Check authentication


Try to connect to your host using Google code provided by your phone:

ssh user@host
Password: 
Verification code: 
Welcome to Ubuntu 12.04 LTS (GNU/Linux 3.2.0-26-generic x86_64)

Last login: Sun Jul 15 11:28:17 2012 from XXX.XXX.X.XX
user@host:~$ 


Tuesday, July 3, 2012

Google Account Howto - Protect and secure your Google Account (gmail, google+, Google Drive...) with Strong Authentication (turn your phone into a Software Secure Token, use 2 steps authentication)

The Goal:

How much is your Google account precious to you ? Does Google host your mails, contacts, documents of all sorts (thanks to Google Drive), professional or confidential datas ? Do you think only protecting it with a password (even strong) is enough ? You may be wrong !

Google offers you a great and free service which is almost the better way to secure your account access and really improves the security of your Google services and your personal data security.

They call it "2 Steps Authentication", in professional environment you may already know it as "Strong Identification" such as RSA SecureID and others professional solutions.

Off course Google gives you all required explanations here:

My Goal here is to present you and easily help to activate this great Google service in a few simple steps.
It will drastically improve your account Security!

With this service, the only way to connect to your account will be to get your login name, your current password and to steal your Smartphone!


What you need:


  • First of all, a Google account ! ^^
  • A computer
  • A smartphone that will act as the Security device, IOS, Android or RIM (even an Ipad or could do the job you will have to always keep it in the pocket !)
  • Optionally a printer to be able to print your personal code for safety 

Step 1: Connect to your Google Account and activate the 2 Steps authentication


  • Connect to your Google account management interface and sign in:
 (you may also connect to any Google service such as gmail, Google Drive..développement. and access to your account properties) :

  • When connected, click on "Security" (bottom left page) :


  • In this new page, look a at the middle of the page and click on "Edit" :
  • In the animation page, Click on "Start Setup" (bottom right):
  • Enter your (real) phone number and select Text message for the way to transmit you the activation code and submit:

  • You will receive a text message from Google, Enter the received code:
  • Select if you want or not trust the computer you are connected to for 30 days:
If you are on your personal computer you can activate this to avoid having to systematically submit your verification code using Google Authenticator.

If you are a non private computer, don't activate this this is not a computer you can trust !


  • Confirm to activate:


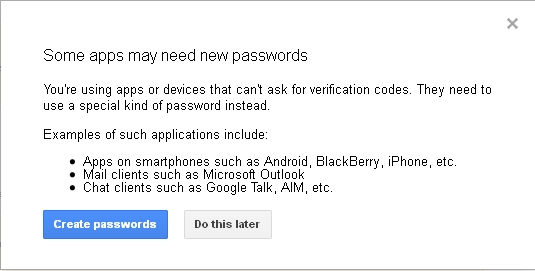
  • In the new page, Sign in (you do not yet need to provide a verification code because not things are not yet over ^^), the following page will open :

  • Answer "Do this later", we will take care of that a small bit later
  • VERY IMPORTANT: Print your backup code in case of loose of your Phone !!!

Print the code provided by Google and keep it always on you (or at home if you prefer), with this code you will be able to connect to your account and deactivate 2 Steps Authentication if you loose your phone and can't get a new code quickly.

Without this code and without your phone or being able to access to a text message Google could send you if required, you will irremediably loose your account access !!!

  • Configure your Phone, click on your smartphone System:


  • You will get this page:


  • Take your Phone and install the Google application "Google Authenticator" :
With Apple's Iphone:


  • Open Google Authenticator:
NB: 
Sorry Screenshots will be in french :)

As i already had a Google account configured, you will see one at the bottom of the screen.
As a consequence, you know now that you can have various Google account configured using 2 Steps authentication !


  • Select the "plus" sign and then select the option "Read bar code":


  • Use your smartphone camera to get the Bar code, Google Authenticator will detect it and automatically add the associated service in the application !
  • Last Step, enter the validation code provided by your phone into your web browser and submit, you're done and 2 steps authentication has been activated


Step 2: Sign out and access to your account using 2 steps authentication

How does it work:

Google Authenticator automaticaly generates a new validation code associated with your account every minute.

When you will sign in in any non trusted computer, you will obligatory have to provide :

- Your login name
- Your account password

And now the Google verification code, it has to be still valid when your enter it in your browser and submit, if not you have to try again using the re-generated code.

 As explained before, you also have the possibility to you allow the computer you are connecting with to be associated as a trust computer.
In other words, if you allow that, there is no validation code required during 30 days and so no 2 steps authentication.

Off course, you should do that only with your own personal computers.
  • Sign in into your account as usual (if not done before, sign out before signing in again)
You will get this new Window on any non trusted computer:

If you want to trust this computer, tick the box.

In any case, enter the code provided by Google Authenticator and Submit "Verify", if your code is valid then you'll be connected.

You have to this every time you connect from a non trusted computer.

Step 3: Configure "Applications codes" for additional access to your account

Any application that was connecting to your account won't work anymore after you activated the 2 steps authentication.

As far an example, your Apple mail Application will be unable to connect to your account until you configure a specific application code to allow it : Iphone, Chrome synchronization...

It will be the case for any application that automatically connects to your Google account and for any Google service associated with your account.

  • Configure a specific Application code for any access needed (you'll do it one time per application that needs an access)
Go back to your account management.

Select "Authorizing applications and sites":

On the new page, Choose a description for your Application and click "Generate Password":


You will get a dedicated password for you application:


And then simply configure your application (in the example your gmail account configuration in your Iphone) and use this password instead of your account password, and you're done !

Repeat this operation for any application that needs access to your account.


Conclusion:

You're done, your Google account access is now much more secured than simply using a standard password mechanism protection.

It happens very often that well known Internet companies are hacked and password databases stolen, if you have the bad idea to use the same password (or even same syntax) it is not really difficult to associate it with your Google account and gain access to it...

With strong Authentication as Google provides, things are much more complicated, hacking your account won't be easy anyway!

As a conclusion, with constant development of Clouds services like Google Drive, a such security mechanism becomes necessary and something you really have to consider if you are interested in protecting your data.