Saturday, September 15, 2012

My Raspberry's nights ! Shopping List and first impression :-)


This will be the first post (of numerous ^^) about my Raspberry Pi that i finally received a few days ago :-)

Let's resume all the history !

First thing, why ?


If you're new to that, the Raspberry Pi is a very nice and cheap ARM mini computer, delivered as it is (no cases, no cables, nothing but the essential the computer!) and created by the Raspberry foundation.

So why  and what to with it ? Well, simple question indeed, just because that's cheap, fun, because you can, because you're such a geek :-)

But seriously, that's a computer and you will do with it whatever you can, whatever you'll be able to, there is a great community of active people working on Raspberry Pi, you can easily get a nice XBMC cheap Media Center, or anything you want, Webserver, Fileserver, and so on!

Where to buy and what to buy ?


That will be the first questions you will to answer and if you are planing to get a Rasperry Pi, quite simple to answer.

First, do not hesitate to take a look at the official Raspberry Pi website:
http://www.raspberrypi.org/

3 places to buy a Raspberry Pi:

  • RS Components (official dealer):
http://uk.rs-online.com/web/generalDisplay.html?id=raspberrypi&cm_mmc=UK-Short_url-_-Internal-Flyer-_-%20RaspberryPie-062012-_-Multimedia

  • Farnell Element14 (official dealer):
http://www.element14.com/community/groups/raspberry-pi

  • Ebay, unofficial and will be more expensive
That's my opinion, but i recommend Farnell, they have a very small delivery wait and are very serious.
I don't know why but Rs components have crazy delivery wait (at this post article writing date) even if they are also serious. (my first attempt to get one, finally canceled) 

Now, what do  you need more ?


My first advice to avoid compatibility issue, check this site:

You will get a lot of information for verified Hardware for your Raspberry Pi!

1. Obligatory : Keyboard / Mouse

You may certainly buy almost anything, it should work with no issue.

Still you can search on the website above before one, but compatibility with any keyboard or mouse should not be a problem. (perhaps not with Bluetooth devices)

I have a Trust wireless Keyboard with Touchpad integrated, this works out the box :-) 


2. Obligatory : Power supply

The Raspberry Pi uses a micro USB Power supply which is not delivered with the computer, letting you the choice to recycle one you may have or to buy a new one.

In any case, the only real recommendation is about output voltage, minimum should be 700ma and recommended 1A output voltage.I bought this one and works with no issues:


With less power, you may encounter many issues with your hardware!

I bought this one and it works with no issues:
http://www.rueducommerce.fr/Accessoires-Consommables/showdetl.cfm?product_id=4869696&option=1


Alternatively, you may also use a powered USB Hub to aliment your Raspberry Pi, this is not recommended and not guaranteed but may also work perfectly.
I have one with a power supply of 2,5A and this also works with no issue.

3. Obligatory : Flash Memory

Then, you need a Flash Memory card (SDcard), i advise you to buy a "Class 10" which will gives you much more performance and are now cheap enough.

Again, check the verified hardware site about before buying it to avoid any problem.

My choice was finally:
http://ec.transcendusa.com/product/ItemDetail.asp?itemid=TS8GSDHC10


4. Optional : HDMI cable

Probably you will want to use an HDMI connection between your Raspberry Pi and your TV or Screen.

Off course, you can also simply use the available DVI connection.

When choosing your HDMI cable, just ensure to buy an 1.4 HDMI Cable, or you may have issue with sound though HDMI. (if you plan to use numerical sound)


5. Optional : Powered USB Hub (USB2)

This is optional but you may quickly need it, just because a Raspberry has only 2 USB ports.

Also, because the Raspberry does not deliver much power through USB, using a Powered USB Hub will be very practical.

IMPORTANT: Don't buy an auto alimented USB Hub, you need one that comes with an external power supply!

Again, you can check the verified hardware site above before buying one, i bought this one and don't have any issue:

http://www.bluestork.eu/produits/hubs-et-card-readers/item/477-hub-4-ports-avec-alimentation?lang=fr


6. Optional : A nice case for you Raspberry Pi !!!

You may want to protect your small animal with a nice case, just because the Raspberry comes absolutely as it is, this may seems a to be a good idea :-)

You'll find a lot of nice cases in the Internet, i would you recommend you to take a look at ebay and you will easily find one you'll enjoy.

My choice: 
http://cgi.ebay.fr/ws/eBayISAPI.dll?ViewItem&item=271038580240&var=570108183975&ssPageName=STRK:MEWNX:IT&_trksid=p3984.m1439.l2648#ht_1128wt_1189


7. Optional : A cheap MCE Remote control if you're planing to use it as an XBMC Media Center

If you are planing to use your Raspberry Pi with XBMC, you will probably want to get a remote control.

Off course you will be able to use your Keyboard or even Android / IOS application to control XBMC but in my experience nothing is more reliable than a simple remote control :-)

You will find thousand of on Ebay or anywhere else, just keep in mind that your life will be easier if you choose a standard MCE Remote (RC6) known to work out the box in XBMC with Linux.

My choice:
http://cgi.ebay.fr/Mando-HTPC-Media-Center-MCE-Multimedia-Philips-RC197-Receptor-Remote-Control-/271056452988?pt=LH_DefaultDomain_186&hash=item3f1c393d7c#ht_2183wt_1434


Ok, done for the shopping list :-)

I received my Raspberry Pi a few days ago, let's see some picture of the animal !


Ok, let's work now !


Sunday, September 9, 2012

Howto : XBMC share and sync your Media library between multiple XBMC instances using Samba/NFS and Mysql


Last update:
09/19/2012: FAQ - deleting databases if required 


If you have multiple XBMC installations (or if you're planing to), you should be interested in sharing and syncing your Media Library between your installations.

When you have multiple XBMC running in your Network, and one central storage, this will really really simplify your life ^^

Advantages:

  • Share watched and unwatched status for your media on all devices
  • Stop watching a movie or TV show in one room then finish watching it in another room automatically
  • Only one library to maintain for all devices
  • Consolidate thumbnails and fanart to save hard drive space (only with XBMC Frodo v12) 

Main source:
http://wiki.xbmc.org/index.php?title=HOW-TO:Sync_multiple_libraries/Share_your_files

You'll find in this Wiki page all required information to achieve this, but i wanted to share my own experience to help you implementing this great feature!

I recommend you to use XBMC Frodo v12, even if not yet stable this version will work better in this configuration as it is able to deal itself with shared Library data like thumbnails and fanart.

With XBMC Eden (v11) sharing the Library works too but you have to synchronize yourself Thumbnails Datas.

Let's start ^^


1. Share your files


First consider your sharing protocol:

You may use 2 major file sharing protocols to share your Media Library, SMB protocol which is the most implemented (used by Windows, implemented in Linux through Samba) or NFS. (Network File System, more known in Unix World)

Choosing is simple, if you have or plan to have Windows XBMC clients, use SMB with Samba.
If you only have Linux Based XBMC, you should use NFS because of betters speed performances.

Note: NFS will also be supported in XBMC under Windows, but you could lack performances


To share your file with SMB using Samba:


If it's not already installed, you have to get samba up and running to share your Multimedia files between your XBMC instances:

On Ubuntu based systems:
$ sudo apt-get install samba


Share your files:

Setup simple shares for your media library, edit "/etc/samba/smb.conf" and add your share, example:
[MY_SHARE]
path = /media/MY_VOLUME
available = yes
browsable = yes
public = yes
writable = yes


Restart samba:
$ sudo service samba restart


To share your file with SMB using NFS:


On Ubuntu based systems, install NFS Server components:
$ sudo apt-get install nfs-kernel-server


Edit "/etc/exports" and configure your shared directory, example (adapt MY_VOLUME  and your Local Network IP):
/media/MY_VOLUME xxx.xxx.xxx.xxx/255.255.0.0(rw,all_squash,insecure,no_subtree_check,async)


Note: "async" option is not recommended for secured write operations, but an XBMC client should not expected to have write operations), this option may enhance NFS performances)
You can also choose "sync".

Restart NFS Server:

sudo /etc/init.d/nfs-kernel-server restart


2. Install and setup Mysql for your Database


Extracted from main XBMC Wiki page, follow these instructions:

Install Mysql:
$ sudo apt-get install mysql


- Create a main admin password when asked

- After installation has complete, edit "/etc/mysql/my.cnf" and do changes as follows:

Look for the line "bind-address" and change "127.0.01" with your host IP address.
You can also simply comment this line to allow access from anywhere.


Restart Mysql:
$ sudo service mysql restart


Login to Mysql using client (adapt password):
$ mysql -u root -p


Create the XBMC user,  set password and rights, enter commands as follows:
CREATE USER 'xbmc' IDENTIFIED BY 'xbmc';
GRANT ALL ON *.* TO 'xbmc';


Exit mysql client. (exit)


3. Set up XBMC


At this point, if you already have set your Media Library inside your main XBMC installation, you have 2 possibilities:

  • Converting your existing Media Library
  • Re-creating your Media Library from scratch

To be honest, even if you have a big Media Library, converting it will be enough complicated for not so much benefits.

This is my opinion, but i would recommend to completely re-create your Library from scratch, this is much easier than converting it, moreover that you won't loose your existing thumbnails and fanart.

If you want to convert it, follow instructions at:
http://wiki.xbmc.org/index.php?title=HOW-TO:Sync_multiple_libraries/Setting_up_XBMC

If you want to re-create it from scratch (my advice), do:

- In XBMC, Go to Video and delete each source you have previously set, say Yes when XBMC asks if you want to purge these media from your Library

- Go to Parameters > Video and Clean your Library

- Configure your mysql settings by editing your advancedsettings.xml (~/.xbmc/userdata/advancedsettings.xml) and adding:

Adapt "xxx.xxx.xxx.xxx" with your main IP Address:
    <videodatabase>
        <type>mysql</type>
        <host>xxx.xxx.xxx.xxx</host>
        <port>3306</port>
        <user>xbmc</user>
        <pass>xbmc</pass>
    </videodatabase> 

    <musicdatabase>
        <type>mysql</type>
        <host>xxx.xxx.xxx.xxx</host>
        <port>3306</port>
        <user>xbmc</user>
        <pass>xbmc</pass>
    </musicdatabase>


- Restart XBMC

- Go in Video and re-set your Media Sources using Samba/NFS shares instead of Local paths

This is very important, right now any source you want to add in your Media Library must be done using Samba shares, files paths must use UNC patchs to be able to be shared.

Here's some screenshots to explain:

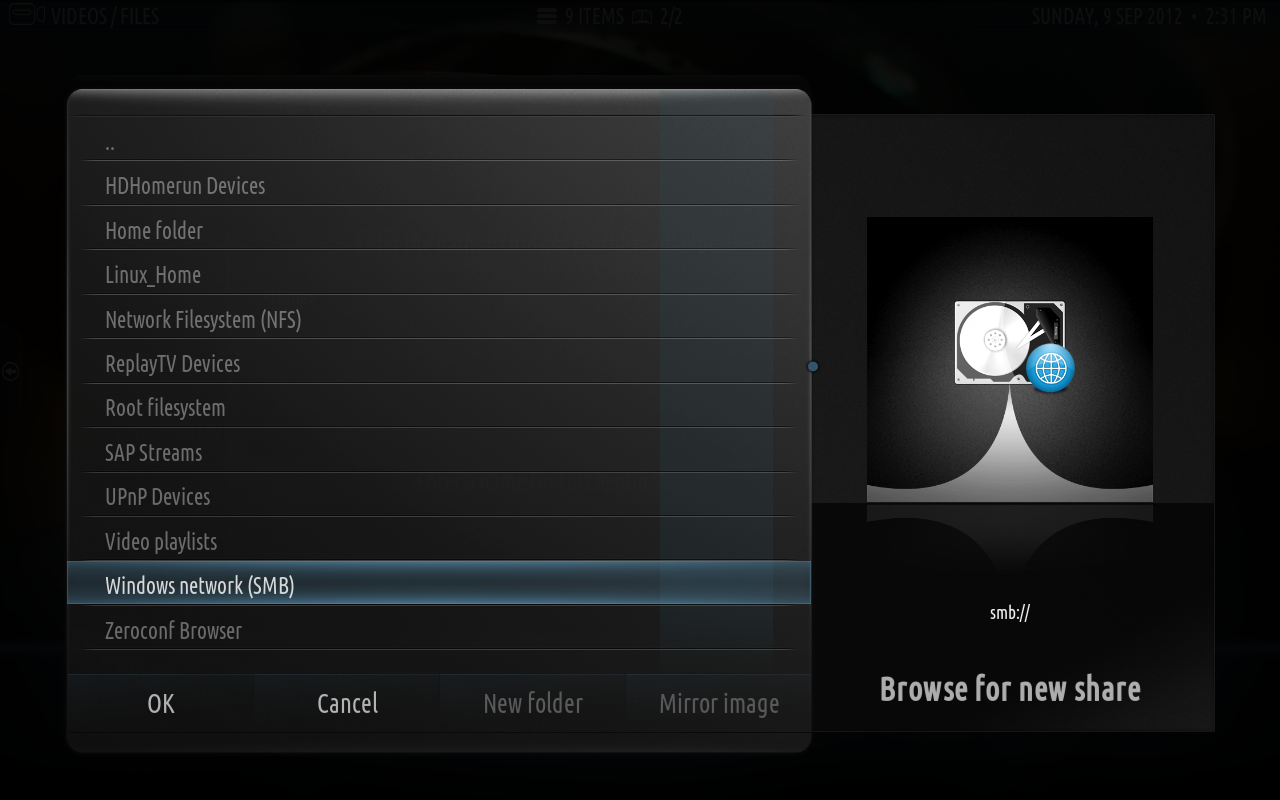
When you will add your source, ensure your choose a SMB or NFS Share:


And navigate until your Media Share, and finally set the scrapper as always.

Any media found will automatically be added to the Mysql Database.


4- Setup other XBMC instances (clients)


- Stop XBMC

First thing to do with any XBMC client instance: Setup advancedsettings.xml

- Edit each of your client advancedsettings.xml and ensure your add the mysql section (adapt your IP Adress), this is exactly the same code than for the main instance:


    <videodatabase>
        <type>mysql</type>
        <host>xxx.xxx.xxx.xxx</host>
        <port>3306</port>
        <user>xbmc</user>
        <pass>xbmc</pass>
    </videodatabase> 

    <musicdatabase>
        <type>mysql</type>
        <host>xxx.xxx.xxx.xxx</host>
        <port>3306</port>
        <user>xbmc</user>
        <pass>xbmc</pass>
    </musicdatabase>


- Restart XBMC (on clients)


Then setup your sources on clients:

For any other XBMC instances, just copy your main XBMC instance sources.xm file to your clients.

This is very important as all of your XBMC instances have to use the same source settings, using SMB shares.

To achieve this, nothing more simple :-)

"sources.xml" is located in "~/.xbmc/userdata/sources.xml"

If you have playlists and favorites, you can also just copy them from your main XBMC instance to client instances:


  • Playlists are located in "~/.xbmc/userdata/playlists"
  • favourites.xml in "~/.xbmc/userdata/favourites.xml"


Final before launching your XBMC client:

About fanarts and other datas:

- If your clients are running XBMC Frodo (v12), then you don't have nothing to do.
XBMC will take care itself with fanart and other data.
Any future added Media will also be available in clients, including Thumbnails and fanart.

- If you have clients with XBMC Eden (v11), you have to copy the Thumbnails directory from your main XBMC instance: ~/.xbmc/userdata/Thumbnails/

For future media add, it will be available on both main XBMC and clients, but you won't get Thumbnails and fanart in clients.

For this to work, you will have to set scrappers in clients too (as in main XBMC instance) and scan for new medias each time you added some. (or enable scan at launch time)


And finally start XBMC.

Magical you'll get your full Media Library centralized and always synced :-)

Off course you main XBMC instance acts as the main server, clients won't be able to access to Media Library if the server is down...


FAQ


- How to re-initialize my database in case of trouble:

In case of trouble you may have to totally re-reinitialize your database. (if you're running thousands of hard tests ^^^).

To do so, simply delete all XBMC databases and re-create from scratch:^

Note: don't worry you won't loose nothing


Login to Mysql using client (adapt password):
$ mysql -u root -p


List XBMC Databases:
mysql > show databases;


Then for each database, delete it, example:
mysql > drop database xbmc_video;


And restart from importing your Media ^^


Howto : Linux - Setup a simple and powerful DNLA server (UPnP protocol) in 5 minutes with minidlna


The Goal:

With "minidlna" you will create within a few minutes a real simple but powerful DLNA Server.

UPnP is a protocol (and DLNA a certification based on this protocol) being more and more used by many manufacturers, it allow you to share your multimedia files between all your DLNA compliant devices.

As a simple example, you have a computer acting as your DLNA server and sharing multimedia files through your network to your Home Cinema.

Minidlna is the perfect DNLA server, simple, light and powerful.

Let's begin!


1 - Install minidna


On Ubuntu based systems, just do:

$ sudo apt-get install minidlna


2 - Configure minidlna


Edit main minidlna configuration file "/etc/minidlna.conf" and do same changes as follows:

- Change port to "49200"

- Add your media sources, you can add as many sources as you want like this:
media_dir=V,<MY VIDEO SOURCE 1>
media_dir=V,<MY VIDEO SOURCE 2>
media_dir=A,<MY MUSIC SOURCE>

- uncomment "friendly_name" (delete "#") and set it to the value you want, it will be the displayed name of your DLNA server

- uncomment "log_dir" (delete #) to ensure main log will be available in /var/log

You case also manually setup the location of the database file. (called files.db)

3 - Start minidlna and begin the scan of your library


Minidlna has been started automatically when installed, but we want it to take in charge our modifications and begin to scan our sources.

First, stop minidlna:
$ sudo /etc/init.d/minidlna stop

Delete existing database:
$ sudo rm /var/lib/minidlna/files.db

Start minidlna:
$ sudo /etc/init.d/minidlna start

And finally take a look at the log files to see what is doing minidlna process:
$ tail -20f /var/log/minidlna.log

Depending on number of files in your sources, minidlna will need a few time to scan, you should see a message like this:
[2012/09/08 17:08:25] scanner.c:719: warn: Scanning /media/FREECOM-HDD/Multimedia/Films_HD-DVD
[2012/09/08 17:08:57] scanner.c:790: warn: Scanning /media/FREECOM-HDD/Multimedia/Films_HD-DVD finished (232 files)!


4 - Access to your DLNA device and navigate to your DLNA Server


Depending on your device, go the your menu and navigate into your DLNA server.

Here is one example screenshot using my LG Home Cinema:


And this works very well, i can play a big big mkv in 1024p (around 45 GB size, native Blu-ray) using local Network (my LG Home Cinema has a 100 Mbps local network connection) with absolutely no issues!

Real great!

Keep in mind that this may also depends on your DLNA device capacity...

Finally, with minidlna note a few last more things:

1. In case of trouble, do not hesitate to delete the database file (see steps above) and restart minidlna, it will automatically recreate the database

2. minidlna sometimes does not like specific characters, you should avoid this in your folder names

3. Some file format may not be playable, it depends on your DLNA device and minidlna.
In my experience, prefer a mkv file, almost all recent devices will support mkv

4. Any added media file will be automatically available in minidlna


Saturday, September 8, 2012

News: XBMC on Android, upcoming!


XBMC on Android has finally arrived, not yet fully mature but still it is here !


If you already know XBMC Media Center (and for sure you love it ^^) you also already know that information (if you don't know XBMC yet, no problem you'll be lucky to discover it!)

But the Android apk is not yet official, and so it's not yet available trough Google play.

My recommendation! Go to:
http://forum.xda-developers.com/showthread.php?p=29737360

Download last apk night build and install, please note a few things:

- XBMC for Android is really young and not yet fully functional

- As far as i know Hardware acceleration is for now only available on XIOS DS (which is the hardware XBMC developers used for XBMC Android, only available in the US and seems to be really hard to find)

So, for any other hardware, Playback will be done using CPU and software, playing HD videos may not possible if your CPU can't do it...

- Sound level has to be set before your launch XBMC, sound level is different between Android and XBMC

The only Android device i have right now is a XOOM 3g (first generation) and XBMC runs with more or less success...

But this is very promising and a real great job, i'm pretty sure there won't be too much time to wait before getting greats Android devices (like MK802 and others) and XBMC solutions :-)


Linux TIP : Run an application in a different Language


Sometimes you may need to run an application in different languages, real easy to do with Linux, won't be permanent so you can get back to your initial language.

Here's how:

1. First locate the language locale you want, let's say you want US English, use the command "locale -av" and locate the section you need:


# locale -av


Output example:


locale: en_US.utf8      archive: /usr/lib/locale/locale-archive
-------------------------------------------------------------------------------
    title | English locale for the USA
   source | Free Software Foundation, Inc.
  address | 59 Temple Place - Suite 330, Boston, MA 02111-1307, USA
    email | bug-glibc-locales@gnu.org
 language | English
territory | USA
 revision | 1.0
     date | 2000-06-24
  codeset | UTF-8

2. Open a terminal, you will open your application within this terminal, that way all of your system won't affected but just the application you want


3. Change your locale environnement var  "LC_MESSAGES" to the locale value, in our example:


$ export LC_MESSAGES=en_US.UTF-8


4. Open your application, language should be US

5. To revert, nothing to do, just close your terminal an re-open the application

Note: For this to work on some application, you may have the install the language associated package.
If this does not work, you may lack a language package.

You can also have to deal with "LANG" var, just test.


Howto Linux : Run Windows applications with Wine and PlayOnLinux (Internet Explorer, Itunes, Games and much more)


The Goal:

Today Linux has access to a very large amount of applications for any need, and hopefully more and more applications comes with a Linux version.

But unfortunately this is not always the case and you may have to run Windows applications, there comes Wine to help us!

Wine is a great and powerful solution that runs Windows softwares on Linux, with more or less success depending on the application complexity and support.

Recently i discovered PlayOnLinux, a wonderfull solution to install and run various Windows applications using Wine, let's say this the better frontend for Wine !

Let's begin ^^

First step: Install PlayOnLinux


Don't hesitate to take a look at great PlayOnLinux website:
http://www.playonlinux.com


For Ubuntu based distributions:

PlayOnLinux is available in Ubuntu repositories, but i recommend to install the last version using their ppa, here's how:

Add the ppa and install PlayOnLinux and Wine:

wget -q "http://deb.playonlinux.com/public.gpg" -O- | sudo apt-key add -
sudo wget http://deb.playonlinux.com/playonlinux_precise.list -O /etc/apt/sources.list.d/playonlinux.list
sudo apt-get update
sudo apt-get install playonlinux wine wine1.4-i386 -y


Wine and PlayOnLinux are off course available for others Linux systems, just follow your specific system instructions to install PlayOnLinux using their website.

Open PlayOnLinux for first launch


First launch, a wizard automatically runs:


Follow instructions, requirements will be automatically downloaded and installed:


Access to Application Repository


Click on "Install Program" to open the application Repository, first i recommend is to check the box "Testing" to get access to all applications:

Note: You may choose "Refresh" to ensure you have last application repository


Example : Install Internet Explorer 8 (listed program)


Note: Internet Explorer will work for most of thing, but do not hope to get Directx working using Wine.
As i far as i know and have tested for now, the only way to get Directx working on Linux is to install Windows into a Virtual Machine... (eg. using Virtual Box, Vmware...)


Just Select, Valid install and follow instructions, click to click ^^


And finally you can run the Application through PlayOnLinux main screen or shortcut created:


Workings out of the box!

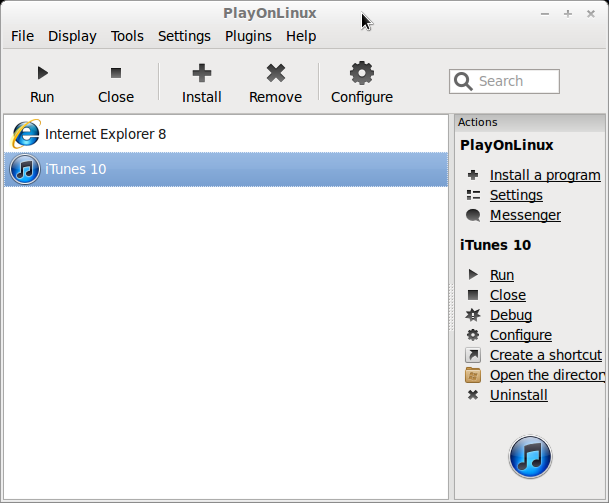
Example : Itunes 10 on Linux

Some screenshots of Itunes 10 running on Linux:


PlayOnLinux has many other possibilities, you can off course install a non listed program and much more, do not hesitate to read documentation on PlayOnLinux Website.


Wine and PlayOnLinux... I said great and Powerful no ? :-)


Tuesday, August 28, 2012

Howto: Truecrypt, Encryption on the fly - Easily Protect and Encrypt your private data with truecrypt


The Goal:

Real simple in fact, anyone should be interested in protecting its own private data, and this protection can only be achieved using encryption.

But as for many things, protecting and encrypting your data often means complicating access and modifications of your files.

This won't be the case with this great and opensource solution able to encrypt/decrypt on the fly.

Truecrypt is definitively the best and the easiest solution i know to protect and encrypt your data, it's just working out the box ^^

Finally, with the growing of cloud services, in my opinion using this kind of solution is definitively recommended...

Imagine you want to save important and private data to an external USB key because you need it, with this solution you will in a few steps create a secured and encrypted key, and easily accessible. (on any system)

Finally, choosing an opensource solution instead of other software is a guarantee of transparency and continuity.

What you need:

Well, nothing...just a computer (any os, Windows, Linux, OSX...) and data to protect :-)
And yes Truecrypt!

I will show 3 cases of uses:

1. Create a secure and encrypted container (some kind of image file, stored in local or not)
2. Create a secure and encrypted device (USB Key, Hard Drive partition...)
3. Create a secure, encrypted and hidden container or device (Container file, USB Key, Hard Drive partition...)

Note:
Step 3 will produce an hidden encrypted container or device, that means in a few words an invisible and undetectable encrypted volume inside the main volume.

That way, someone that gains access to your main volume (you may have to reveal your password or someone cracked it) won't be able to access to your real private data.

You would have 2 passwords sequences, one for the main volume (which is still encrypted) and one for the hidden device.

First, install Truecrypt

No matters the system you're running on, Truecrypt is available for all OS, go to:

http://www.truecrypt.org/downloads

I won't cover the installation which is really easy (even for Linux ^^, no need for external software or dependencies)


Now that Truecrypt is installed, let's see some use examples of use!


Method 1: Create a secure and encrypted container

This is one of the solution you can use with Truecrypt, if a few words, you will create a container (which is just a file, like an iso or dmg for Mac users) that will encrypted and protected.

This container will mounted in your system like any external drive, any file you will store in it will be accessible and encrypted on the fly, so can add, remove or modify files without having to deal with anything related to encryption.

Open Truecrypt:


Click on "Create Volume" to open the Truecrypt wizard:


Let's create our container, click next:


At this point, we will create a standard and non hidden volume.
If already you are interested by the hidden volume, please go directly to the Method 3 example.

For the explanation, an hidden volume is an invisible and undetectable secured and encrypted volume inside your secured volume, by this way you could always be forced to give access to the secured volume without having to reveal the existence of the hidden volume.

This is feature is very great and powerful but may be a little complicated for the first use, this is why i prefer to do it in the 3rt method.

So we choose a standard Volume:


Select the location and the file name you want, optionally you can leave "Never Save History" set, it will tell Truecrypt to never save history of volumes mount.
In other words the location of the your container will never be shown inside Truecrypt. (for more security)

Note:
Please note that you absolutely choose any file extension you want, Truecrypt won't care about that, so just choose something common that won't appear as something that could be special or protected. (img, rar, zip, doc...what you prefer)

In next screen, choose your encryption algorithm:


In this section, you have to an encryption and hash algorithm, the most secured method will be using combinated algorithm, such as "AES-Twofich-Serpent".

Note that using combinated method requires more operation and CPU, and so offers less read and write speeds.

You can click on "Benchmark" to see read and write speed you will get with different methods available:


Just choose your method, if you want the best security you can choose "AES-Twofish-Serpent" and "SHA-512".

Then select the container size and click next.
Please note a container can't be resized later. (but still you can create a new one and migrate your data if required)


Set the container password and optionally key files access:


Using key files is optional but depending on your needs could be something really interesting.
With this feature, getting the password won't be enough to gain access to protected data, getting the key files will also be required, but off course if you loose your key files, you loose your data access.

The password needs to be really secured and complex, you should think about using a password sentence (a citation, proverb, whatever you want) in combination with a password containing various characters  (standards, alpha numerical, specials)

Then, set the file format:


If you are using Windows (or plan to access to your container from Windows), then choose Fat.
Otherwise Ext4 if you are using Linux.

If you are creating you device on Linux, next screen will ask you to choose the option for system crossover support, if you plan to access to your container for both system, ensure to use the crossover support.

Then follow the instruction and format the device, final screen:


Exit the wizard, your container is ready.

Mounting your encrypted container:

In main Truecrypt screen, select your container, provide your password (and key files if required) and mount your volume:


You volume is now available to read and write ^^

To properly close your container, select your volume and select "Dismount". (you can also choose "Dismount All" if this is the only volume mounted)


Method 2: Create a secure and encrypted device (eg USB key...)


A real simple and comprehensive example of use will be creating a secured and encrypted USB Key.
But this can also be any partition of an internal or external Hard Drive or SSD, Flash memory, any storage you want.

Note:
Please note that any data present on your device will be lost!

To begin:

  • Connect your device
  • Ensure you have one partition to use (remember data will be lost)
  • Note the device name


Connect your device, open Truecrypt and click on "Create Volume", then select the required option:


Select the Volume type, again we will create a standard volume.

Then, select your device (in this example my USB device is seen under Linux as /dev/sdc1) :


Valid any warning message and choose encryption / Hash algorithm (see details in method 1).

The only difference with Method 1 will come at the device formatting step:


As the device hasn't been yet used as an encrypted device, you can let the box "Quick Format" unchecked. (which will result in encrypting also free space)

Then follow instructions and proceed to creating the device. (same than Method 1)

If you plan to use it on Windows, remember to select FAT as the file system and system crossover support if you created it on Linux.

Mounting your encrypted device:


Open Truecrypt, if you don't want to specify the name of your device, you can also choose the option "Auto-Mount Devices", it will scan your system and automatically detect your secured USB key:


Your device will accessible as any Volume, and you can do any operation you want.

To properly close your device, go in Truecrypt and select "Dismount All"


Method 3: Create a secure, encrypted and hidden container or device

Open Truecrypt and start the Volume creation wizard (Create Volume):


For the example purpose, we will create an hidden container, you can off course also choose to create a secured hidden device.


Select the device name and location:


As usual, select your Encryption and Hash algorithm, example:


Select the Outer Volume size, it is specific to hidden volume and will represent the global Volume size.

For the example, we will create a 1GB Volume:


Set the Outer Volume password, this won't be the hidden Volume password (where you will store you real private data) but the visible Volume password:


Next screen, Outer volume creation done:


Click Next to configure the Hidden Volume:


As for the Outer Volume, configure Encryption:


Select the Hidden Volume Size, this will the maximum space usable by the Hidden Volume inside the main (Outer) Volume:


Configure the Hidden Volume password, the password must be different from the main (Outer) Volume!


Choose file system option, example:


Choose crossover support, in my example case i used Linux to create the Volume so Truecrypt asks if i plan to use it on other systems than Linux, example:


Then format the Volume:


And exit the Wizard.

Mounting your device:

When you are using an hidden device, things are not much more complicated than with standard devices.

In fact, Tryecrypt will automatically mount the Outer or the Hidden device, depending on the password (Outer volume password or Hidden volume password) you will provide.

The only thing you have to care about is protecting the hidden device from being damaged when you mount the Outer volume.

To mount the main (Outer) Volume:

Open Truecrypt, select your file and click on mount, put your password and select "Option" to protect the hidden volume from being damaged by data copied into the Outer Volume:


Now the Outer volume is mounted, copy some data that could seem sensitives and umount it.

Then, using he same way but without the hidden volume protection option mount your hidden volume providing your hidden volume password.

And finally, you can manage your real private data in your hidden space.

Real powerful!